What is RTOS and why do you want to use it?
Real-time operating systems (“RTOS”) are used in embedded systems when more than one tasks need to be done concurrently or within a specific amount of time. Imagine a motor controller or an application with user interface where the display needs to be updated while processing button presses while communicating over WiFi. Depending on your project it might be worth to take a look at a real-time operating system instead of a classical infinte-loop approach.
Getting started
In this post I use the Esp32 feather board from Adafruit and program it using FreeRTOS. FreeRTOS is a popular open source real-time operating system which is also used in the industry. The official Vanilla FreeRTOS project has been ported for the ESP32. There are minor differences in using the ESP-IDF FreeRTOS version instead of Vanilla FreeRTOS, but in general they are quite similar.
To get started download following and configure your IDE of choice. Depending on the IDE you use it might handle it for you:
- FreeRTOS from their Website
- Esp-32 tool-chain
Programming using FreeRTOS
When using an RTOS you write tasks instead of writing your code inside the main while-loop. A task is actually just a function. Within each method you use an own while-loop. All the tasks are then registered to the scheduler which when running will give each task a specific amount of runtime over and over again. This is also called time slicing. And because you know how much time each task gets it is called “real-time” operating system. “Real-time” does not mean everything is happening in “real” time, but instead tells you the OS makes sure a task will be finished within a pre-defined time.
When using an RTOS all the principles of operating system developement come into account. But don’t be afraid, it’s fun!
Creating a task
A task is actually just a function and should contain an infinite while-loop. It might look something like that:
    void toggleLED(void *parameter) {
        while(1) {

            // Do something like set a pin high
            digitalWrite(led_pin, HIGH);

            // Delay while letting the scheduler run another task
            vTaskDelay(milliseconds / portTICK_PERIOD_MS);

            // Do something else
            digitalWrite(led_pin, LOW);

            // Again go sleeping and let another task run
            vTaskDelay(milliseconds / portTICK_PERIOD_MS);
        }
    }
When calling the vTaskDelay()-function the scheduler will set the calling task to sleep and let another task run. vTaskDelay() expects the number of ticks to delay. In order to get the number of ticks devide the milliseconds by the “portTICK_PERIOD_MS”-parameter which defaults to 1ms.
After implementing the task it needs to be registered to the scheduler. In Vanilla FreeRTOS we can use the xTaskCreate()-function. The ESP32 has two cores and by using this function, we do not have controll on which core our task gets executed on. So in ESP-IDF FreeRTOS there is another function called xTaskCreatePinnedToCore() which we use here. Here we can specify “app_cpu” which is core #1 of the ESP32 processor.
    xTaskCreatePinnedToCore(
        toggleLED,          // Our function we implemented above
        "Toggle LED",       // Task's name
        1024,               // Stack size in bytes (ESP32 specific) (words in Vanilla FreeRTOS)
        NULL,               // Parameter to pass to our functions - here just NULL
        1,                  // Task priority. In FreeRTOS a higher number means higher priority
        NULL,               // Task handle with which it is possible to i.e. stop the task
        app_cpu             // Run on core #1
                            // In the ESP32 app_cpu is cpu #1 and pro_cpu is cpu #0
    );
Start the scheduler
After creating tasks the scheduler needs to be started. This can be achieved with the vTaskStartScheduler()-function.
vTaskStartScheduler();
How do scheduling and time sclicing work?
Each time slice the operating system decides which task to run next. Therefore the scheduler task is regularly called by a hardware timer interrupt (so called “tick”). The scheduler then gives control to the next task to run. How does the scheduler decide which task to run next? There are different approaches a scheduler can base its decisions on. In a real-time operating system we often find so called preemptive scheduling. Normally each task has a defined priority. And the scheduler will give runtime to the task with the highest priority. If there are more than one tasks with the same priority they will be excecuted in a round robin fashion. Remember, we defined the priority in the xTaskCreatePinnedToCore()-function above. It is also possible to change priority during runtime. In FreeRTOS (in contrast to other OS) a higher number also means a higher priority.
If the scheduler switches tasks it has to save all of the first tasks data, cpu register values etc. and reload all those values and registers of the task running next. This is called a context switch. And this is the reason why you needed to specify a stack size in the xTaskCreatePinnedToCore()-function above. Fortunately you don’t need to think much about context switching, this is done by the RTOS itselve.
Task states
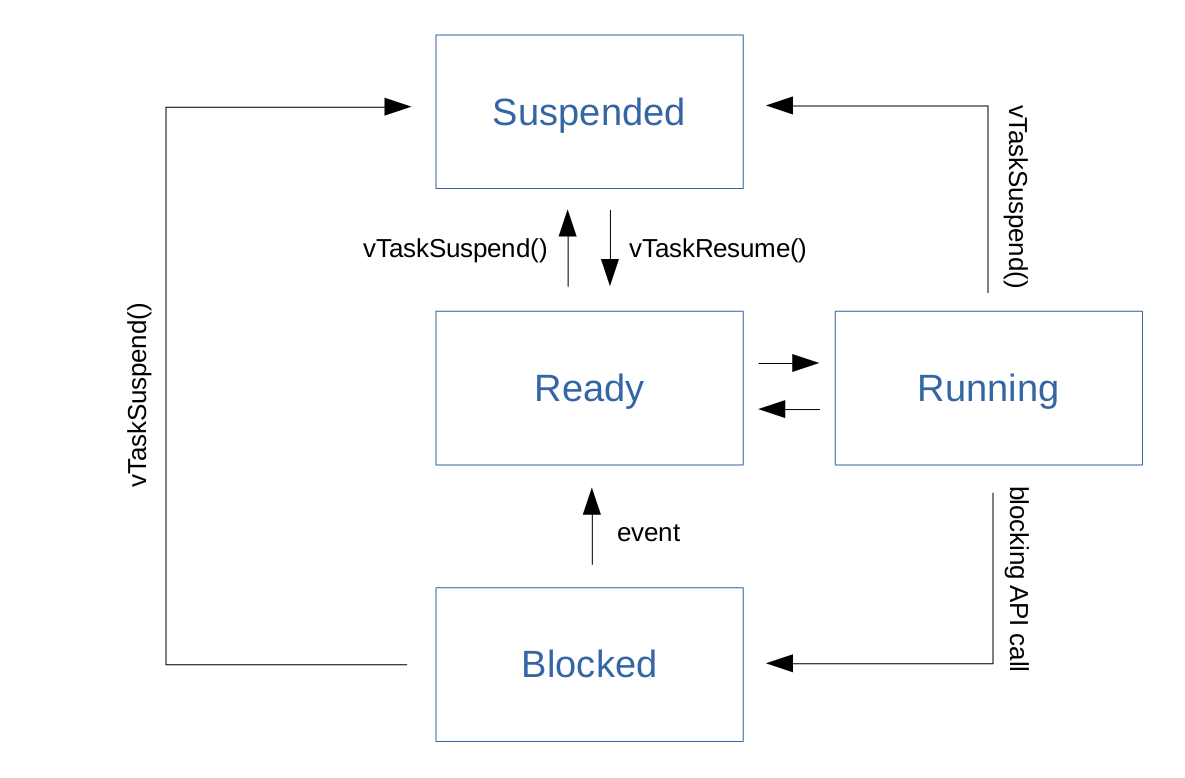
Tasks can be in one of four states: When created a task is in the ready-state to tell the scheduler it can be run. When running - yeah - the task is in the running state. If the scheduler wants to give runtime to another task it puts the running one into the ready-state again. If the running task for example calls the vTaskDelay()-function it switches into the blocked-state. There it cannot be called again until an unblocking event occurs - in the example the delay-timer expiring. A tak can also be put into the suspended-state where it needs to be explicitly called to resume. Have a look at the following graphic:
How do we control one task from within another one?
If we want to control a task from another one we first define a global task handle:
static TaskHandle_t task_toggleLED = NULL;
And take that as parameter when calling the xTaskCreatePinnedToCore()-function:
    xTaskCreatePinnedToCore(
        toggleLED,
        "Toggle LED",
        1024,
        NULL,
        1,
        task_toggleLED,     // Task handle we defined above
        app_cpu
    );
Now within another task we can use the defined task handle and call the vTaskSuspend()-function to put it into the suspend-state or the vTaskResume()-function to put it into the ready-state again (have a look at the image above where you can see the function-calls corresponding to the states):
    vTaskSuspend( task_toggleLED ) --> suspend our task
    vTaskResume( task_toggleLED ) --> put the task into ready-state again
Memory allocation in FreeRTOS
In FreeRTOS each task gets allocated memory inside the heap containing the task’s stack and a so called task control block (TCB). The memory is allocated when creating a task using the xTaskCreate()- or the xTaskCreatePinnedToCore()-function. Have a look at the following graph:
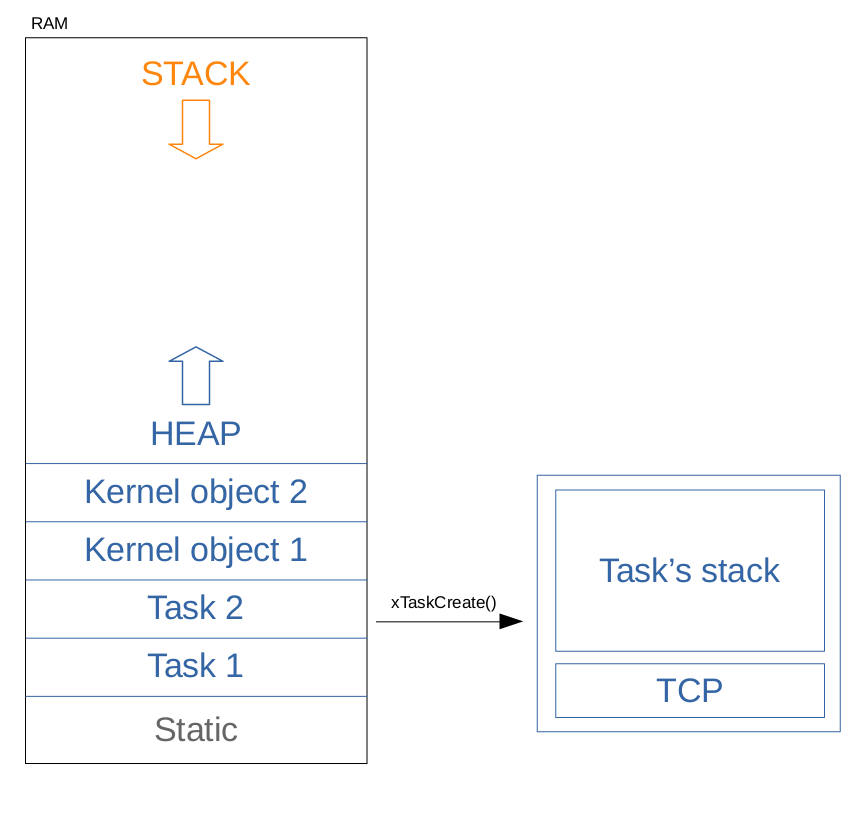
Because of the memory allocation structured like that you have to to specify the stack size when creating the task. Make sure the task does not write out of its allocated stack memory otherwise the operating system will throw an error. Or in the worst case - if not detected - undefined behavior will appear. If you allocate memory make sure to free it when it is not needed anymore. When calculating your needed stack size add 760 bytes as overhead.
You can also get the currently free remaining stack memory in words by using the uxTaskGetStackHighWaterMark()-function, or the free heap memory in bytes by using the xPortGetFreeHeapSize()-function.
FreeRTOS provides threadsave versions of malloc and free: Use the pvPortMalloc()- and the vPortFree()-functions.
Queues
Queues can help to exchange information between tasks. They are first-in-first-out and can contain data of any type (integers, structs, …). You have to create a queue-handle first, in a global scope so that all tasks can send and receive data from the queue:
static QueueHandle_t myQueue;
Then you can create the queue and specify how many elements it should contain and the size per element:
myQueue = xQueueCreate(number_of_elements, size_of_one_element);
Within a task you can send data to that queue with following functioncall:
xQueueSend(myQueue, (void *)&data_to_send, time_out);
And within another task you can receive new data:
xQueueReceive(myQueue, (void *) &where_to_store, time_out);
The send- and receive- calls return pdTRUE or pdFALSE if they could send/not send or read/not read new data to/from the queue. So it can be usefull to check for that return value before going on in code.
Mutex and Semaphores
An important topic in the field of operating systems are mutexes and semaphores. When two processes want to access a global variable at the same time or if one process preempts another one which is not ready with its operations yet race conditions can occure. Therefore a mutex is used to “lock” a variable. It is an atomic operation and prevents a process to access a variable if it is used by another process. Similar a semaphore locks a variable, however, it can also control more than one processes accessing a variable at the same time.
Finally
In my opinion FreeRTOS and in general programming with an OS is fun. And while complexity and debugging gets challenging - especially when code execution on more than one core - it can make life easier if things need to be done concurrently. It is always depending on the use case and the project you are working on.